前言
Android源码分析之View系列之绘制流程
正文
一. 概述
View的绘制流程分为三大步: measure, layout, draw; measure即测量, 测量View的大小; layout即布局, 按照一定的规则排布View; draw即绘制, 绘制View的外形; 这三步是和我们自定义View息息相关的, 熟悉和掌握这三大流程, 我们才能随心所欲的定制View; 本文也将从这三个方面入手, 结合源码讲解
在开始之前, 需要先了解一下View绘制的整体流程, 如下图;
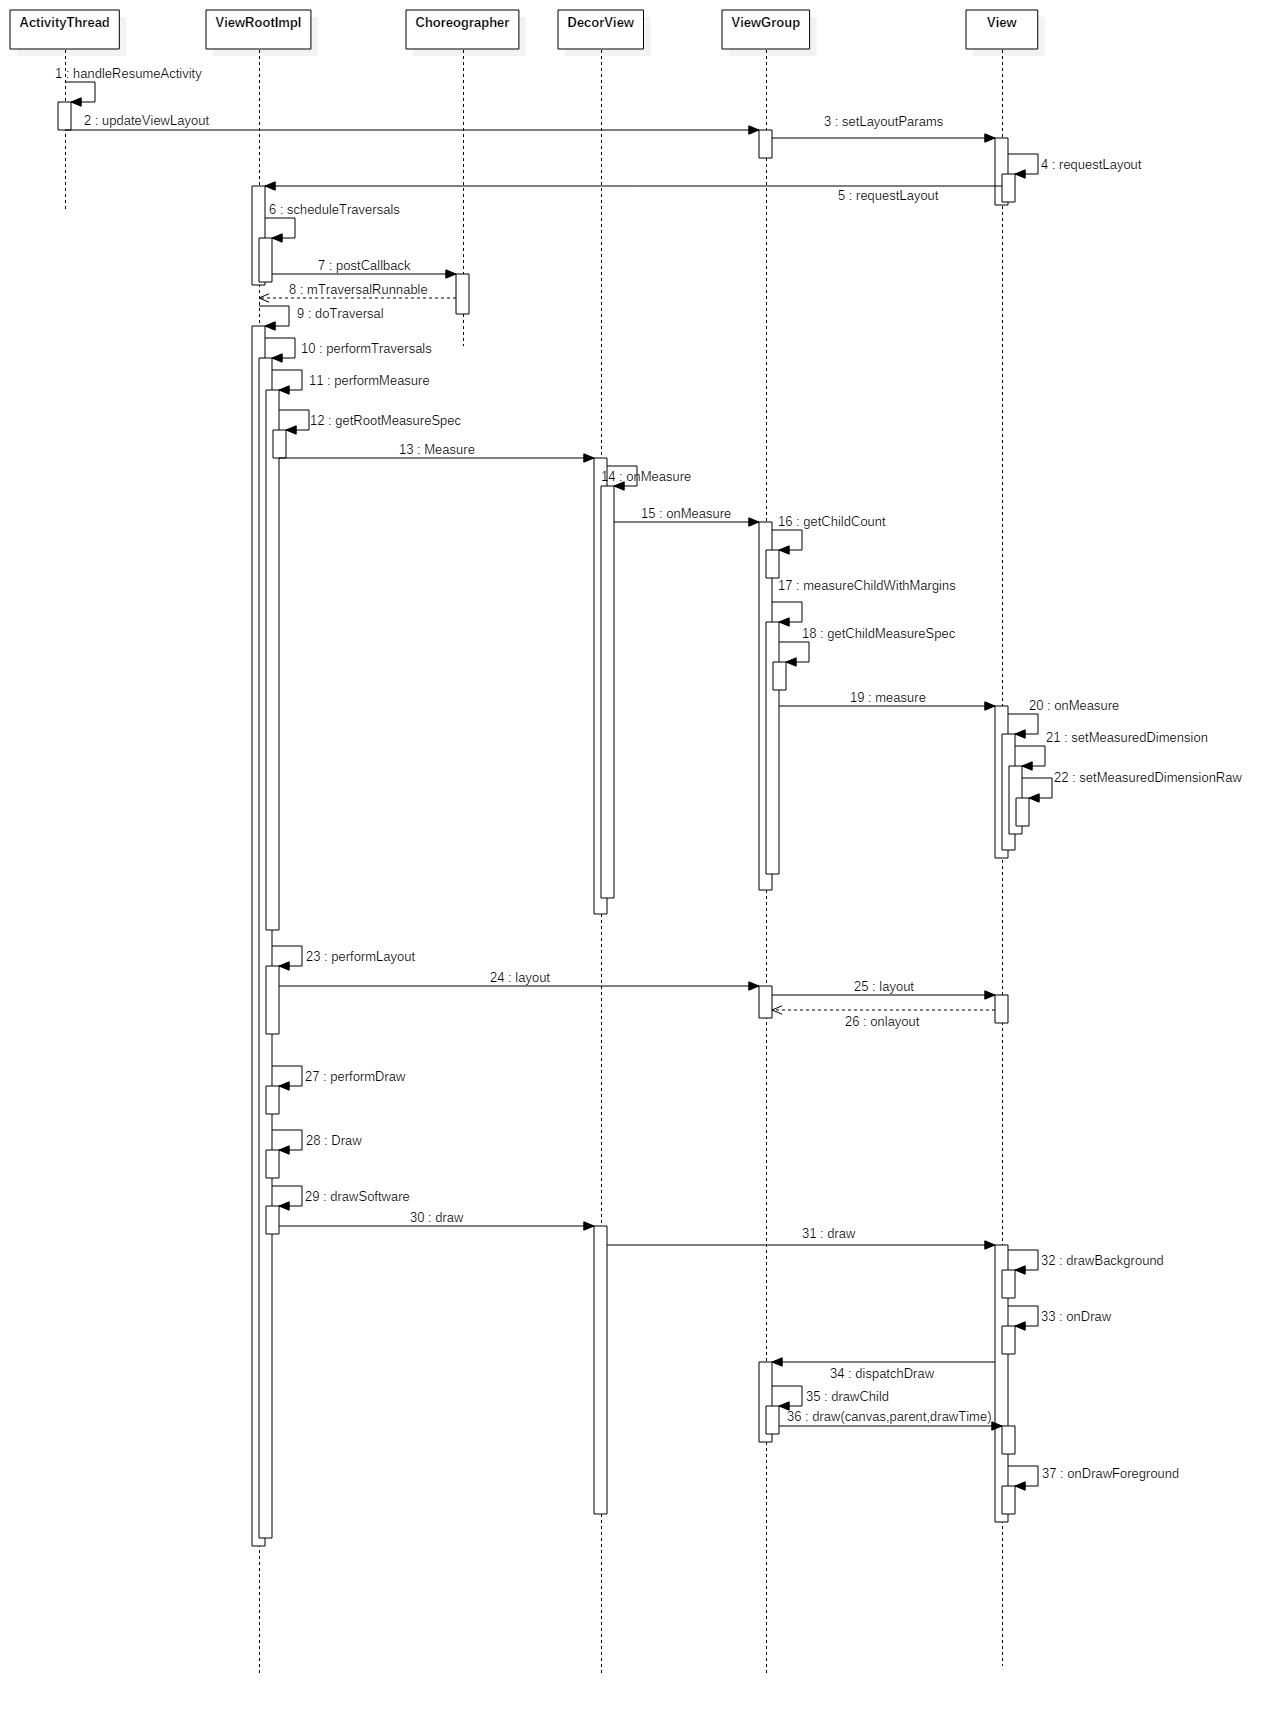
注: 图片来自: https://www.jianshu.com/p/dc0b039e7c4f
可以看出, 与View三大流程直接相关的是从performTraversals()开始的; 大致流程如下
private void performTraversals() {
    ...
    int childWidthMeasureSpec = getRootMeasureSpec(mWidth, lp.width);
    int childHeightMeasureSpec = getRootMeasureSpec(mHeight, lp.height);
    performMeasure(childWidthMeasureSpec, childHeightMeasureSpec);
    ...
    performLayout(lp, mWidth, mHeight);
    ...
    performDraw();
    ...
}
二. measure过程
在开始讲解measure过程之前, 我们需要先了解一下MeasureSpec, 因为MeasureSpec对于measure过程的理解还是很重要的
2.1 MeasureSpec
MeasureSpec是一个32位int类型的值, 是SpecMode和SpecSize的位组合; 高2位表示SpecMode, 低30位表示SpecSize, 这样设计其实是为了节约空间; 关于二者如何组合, 可以参见以下代码; 可以看出, 其实就是通过MODE_MASK掩码以及位操作实现将两个int类型整合为一个32位int类型的MeasureSpec; 当然, 要分别提取这两个值的话, 也可以很简单的用位操作实现, 代码比较简单, 就不贴啦~
        public static int makeMeasureSpec(@IntRange(from = 0, to = (1 << MeasureSpec.MODE_SHIFT) - 1) int size,
                                          @MeasureSpecMode int mode) {
            if (sUseBrokenMakeMeasureSpec) {
                return size + mode;
            } else {
                return (size & ~MODE_MASK) | (mode & MODE_MASK); // MODE_MASK  = 0x3 << 30;
            }
        }
SpecMode即测量模式, 一共有三类:
-
UNSPECIFIED: 父容器不对
View有任何限制, 要多大给多大, 这种情况一般用于系统内部 -
EXACTLY: 对应于
LayoutParams中的match_parent和具体数值这两种模式 -
AT_MOST: 父容器指定了一个可用大小即
SpecSize,View的大小不能大于该值, 对应于LayoutParams中的wrap_content
从SpecMode的类型区别可以看出, MeasureSpec的确定受LayoutParams的影响, 但是也要分情况: 对于RootView即DecorView来说, 由于其没有父View, 所以DecorView的MeasureSpec由窗口尺寸和自身的LayoutParams共同决定; 对于普通View来说, 其MeasureSpec由父容器传递的MeasureSpec和自身的LayoutParams共同决定
普通View的MeasureSpec创建规则见下表
| childLayoutParams \ parentSpecMode | EXACTLY | AT_MOST | UNSPECIFIED |
| dp/px | EXACTLY childSize |
EXACTLY childSize |
EXACTLY childSize |
| match_parent | EXACTLY parentSize |
AT_MOST parentSize |
UNSPECIFIED 0 |
| wrap_content | AT_MOST parentSize |
AT_MOST parentSize |
UNSPECIFIED 0 |
注: 摘自«Android开发艺术探索»
上面表格中展现的规则需要好好理解:
-
当
Child尺寸是明确的值时, 即layout_width和layout_height有确定的值, 那么不管父View的SpecMode是什么,Child都保持规定尺寸不变; 这点比较好理解, 因为明确指定Child的尺寸之后, 我们肯定希望显示的也是指定尺寸 -
当
Child的layout_xxx为match_parent时, 如果父View是确定尺寸, 那么Child的尺寸也能确定, 也就是父View尺寸, 所以为EXACTLY, parentSize也可以理解; 如果父View尺寸不确定, 此时父View只知道一个最大尺寸, 那么Child由于match_parent, 也只能知道一个最大尺寸, 而且该最大尺寸不应该超过parentSize, 所以为AT_MOST, parentSize -
当
Child的layout_xxx为wrap_content, 即尺寸大小不确定的话, 那么不管父View是具有确定尺寸还是尺寸不确定, 反正Child的尺寸始终是不确定的, 所以此时应该为AT_MOST, 而且Child尺寸也不应该超过父View尺寸, 故综上为AT_MOST, parentSize
2.2 DecorView的measure过程
我们知道, DecorView是整个View树的root, 是一个FrameLayout, 我们首先来看DecorView的测量过程; 在performTraversals()中, 首先通过getRootMeasureSpec()来获取MeasureSpec, 如下; 结合上面MeasureSpec的构建规则可以理解DecorViewMeasureSpec的构建规则如下:
-
如果
DecorView的LayoutParams为MATCH_PARENT, 由于DecorView没有父View, 所以其尺寸就为窗口尺寸,SpecMode为EXACTLY -
如果
DecorView的LayoutParams为WRAP_CONTENT, 此时DecorView尺寸不确定, 最大尺寸不应该超过窗口尺寸, 所以为AT_MOST, windowSize -
如果
DecorView明确规定了自己的尺寸, 那么就不受窗口尺寸的影响, 为EXACTLY, rootDimension
private static int getRootMeasureSpec(int windowSize, int rootDimension) {
        int measureSpec;
        switch (rootDimension) {

        case ViewGroup.LayoutParams.MATCH_PARENT:
            // Window can't resize. Force root view to be windowSize.
            measureSpec = MeasureSpec.makeMeasureSpec(windowSize, MeasureSpec.EXACTLY);
            break;
        case ViewGroup.LayoutParams.WRAP_CONTENT:
            // Window can resize. Set max size for root view.
            measureSpec = MeasureSpec.makeMeasureSpec(windowSize, MeasureSpec.AT_MOST);
            break;
        default:
            // Window wants to be an exact size. Force root view to be that size.
            measureSpec = MeasureSpec.makeMeasureSpec(rootDimension, MeasureSpec.EXACTLY);
            break;
        }
        return measureSpec;
}
构建好DecorView的MeasureSpec之后, 就直接传入了performMeasure()中, performMeasure()的代码如下; 可以看出, 接下来就是将MeasureSpec传递给mView进行测量, 而这里的mView其实就是DecorView, 而measure()方法是final的, 不可重写, 所以应该追溯到View(继承链为: DecorView –> FrameLayout –> ViewGroup –> View)的measure()方法, 在View的measure()方法中, 则是去调用了onMeausre(), onMeasure()不是final的,
所以我们应该去分析的是DecorView的onMeasure()
private void performMeasure(int childWidthMeasureSpec, int childHeightMeasureSpec) {
        if (mView == null) {
            return;
        }
        Trace.traceBegin(Trace.TRACE_TAG_VIEW, "measure");
        try {
            mView.measure(childWidthMeasureSpec, childHeightMeasureSpec);
        } finally {
            Trace.traceEnd(Trace.TRACE_TAG_VIEW);
        }
}
DecorView的在onMeasure()中将MeasureSpec进行处理和判断之后, 调用了super.onMeasure(), 即FrameLayout的onMeasure(); 如下, 可以看出, FrameLayout的onMeasure()方法中处理了Margin(measureChildWithMargins())和Padding(getPaddingXXX), 而在measureChildWithMargins()中会去调用child.measure(), 将MeasureSpec往下传递(即递归测量), 这样就将测量工作传递到了子View中
// DecorView.onMeasure()
protected void onMeasure(int widthMeasureSpec, int heightMeasureSpec) {
    ...
    super.onMeasure(widthMeasureSpec, heightMeasureSpec);
    ...
}

// FrameLayout.onMeasure()
protected void onMeasure(int widthMeasureSpec, int heightMeasureSpec) {
        int count = getChildCount();
        for (int i = 0; i < count; i++) {
            final View child = getChildAt(i);
            if (mMeasureAllChildren || child.getVisibility() != GONE) {
                measureChildWithMargins(child, widthMeasureSpec, 0, heightMeasureSpec, 0);
                final LayoutParams lp = (LayoutParams) child.getLayoutParams();
                maxWidth = Math.max(maxWidth,
                        child.getMeasuredWidth() + lp.leftMargin + lp.rightMargin);
                maxHeight = Math.max(maxHeight,
                        child.getMeasuredHeight() + lp.topMargin + lp.bottomMargin);
                childState = combineMeasuredStates(childState, child.getMeasuredState());
                if (measureMatchParentChildren) {
                    if (lp.width == LayoutParams.MATCH_PARENT ||
                            lp.height == LayoutParams.MATCH_PARENT) {
                        mMatchParentChildren.add(child);
                    }
                }
            }
        }

        // Account for padding too
        maxWidth += getPaddingLeftWithForeground() + getPaddingRightWithForeground();
        maxHeight += getPaddingTopWithForeground() + getPaddingBottomWithForeground();
        ...
}

// FrameLayout.measureChildWithMargins()
protected void measureChildWithMargins(View child,
            int parentWidthMeasureSpec, int widthUsed,
            int parentHeightMeasureSpec, int heightUsed) {
            ....
            child.measure(childWidthMeasureSpec, childHeightMeasureSpec);
}
子View中的measure过程分为ViewGroup和View的测量过程
2.3 ViewGroup的measure过程
我们来看子View是一个ViewGroup时的测量过程; 其实对于ViewGroup来说, 不同的ViewGroup有不同的布局规则, 比如LinearLayout, 有竖直布局和水平布局两种, 而这两种不同的布局测量方式也不同; 所以我们这里只是简单的看一下ViewGroup对子View的通用测量方式
代码如下; 测量逻辑比较简单, 也是遍历所有的子View, 然后将MeasureSpec往下传递, 实现递归测量, 不做细讲啦~
protected void measureChildren(int widthMeasureSpec, int heightMeasureSpec) {
        final int size = mChildrenCount;
        final View[] children = mChildren;
        for (int i = 0; i < size; ++i) {
            final View child = children[i];
            if ((child.mViewFlags & VISIBILITY_MASK) != GONE) {
                measureChild(child, widthMeasureSpec, heightMeasureSpec);
            }
        }
}


protected void measureChild(View child, int parentWidthMeasureSpec,
            int parentHeightMeasureSpec) {
        final LayoutParams lp = child.getLayoutParams();

        // 获取child的MeasureSpec, 同时考虑Padding
        final int childWidthMeasureSpec = getChildMeasureSpec(parentWidthMeasureSpec,
                mPaddingLeft + mPaddingRight, lp.width);
        final int childHeightMeasureSpec = getChildMeasureSpec(parentHeightMeasureSpec,
                mPaddingTop + mPaddingBottom, lp.height);

        child.measure(childWidthMeasureSpec, childHeightMeasureSpec); // 递归调用, 又回到了这里
}
需要注意的一点是子View的MeasureSpec的构建, 这里以getChildMeasureSpec()为例, 如下; 其构造规则除了考虑了Padding以外, 和上面MeasureSpec的构造规则表是相同的, 可以结合代码注释再次理解该表
public static int getChildMeasureSpec(int spec, int padding, int childDimension) {
        int specMode = MeasureSpec.getMode(spec);
        int specSize = MeasureSpec.getSize(spec);

        int size = Math.max(0, specSize - padding);

        int resultSize = 0;
        int resultMode = 0;

        switch (specMode) {
        case MeasureSpec.EXACTLY: // 如果父View尺寸确定
            if (childDimension >= 0) { // childDimension >= 0, 表示的是子View的layout_xxx设置了具体的数值, 因为wrap_content = -2
                                       // match_parent = -1
                resultSize = childDimension; // 那么集合MeasureSpec的构造规则及对应解释, 这里应该为childDimension, EXACTLY
                resultMode = MeasureSpec.EXACTLY;
            } else if (childDimension == LayoutParams.MATCH_PARENT) { // 如果子View的layout_xxx为match_parent, 同时父View尺寸也确定
                resultSize = size;  // 说明子View尺寸确定, 且为父View尺寸
                resultMode = MeasureSpec.EXACTLY;
            } else if (childDimension == LayoutParams.WRAP_CONTENT) { // 如果子View的layout_xxx为wrap_content, 父View尺寸确定
                resultSize = size;  // 说明子View尺寸不确定, 最大不应该超过父View尺寸
                resultMode = MeasureSpec.AT_MOST;
            }
            break;

        case MeasureSpec.AT_MOST: // 如果父View尺寸不确定
            if (childDimension >= 0) {
                resultSize = childDimension; // 如果子View的layout_xxx设置了明确的值
                resultMode = MeasureSpec.EXACTLY; // 那么子View有确定尺寸, 即为设置的值
            } else if (childDimension == LayoutParams.MATCH_PARENT) { // 如果子View的layout_xxx为match_parent, 但是父View的尺寸不定
                resultSize = size; // 那么子View的尺寸也不定, 最大尺寸不应该超过父View尺寸
                resultMode = MeasureSpec.AT_MOST;
            } else if (childDimension == LayoutParams.WRAP_CONTENT) { // 如果子View的layout_xxx为wrap_content, 父View尺寸不定
                resultSize = size; // 那么子View尺寸也不定, 最大尺寸不应该超过父View尺寸
                resultMode = MeasureSpec.AT_MOST;
            }
            break;

        case MeasureSpec.UNSPECIFIED:
            if (childDimension >= 0) {
                // Child wants a specific size... let him have it
                resultSize = childDimension;
                resultMode = MeasureSpec.EXACTLY;
            } else if (childDimension == LayoutParams.MATCH_PARENT) {
                // Child wants to be our size... find out how big it should
                // be
                resultSize = View.sUseZeroUnspecifiedMeasureSpec ? 0 : size;
                resultMode = MeasureSpec.UNSPECIFIED;
            } else if (childDimension == LayoutParams.WRAP_CONTENT) {
                // Child wants to determine its own size.... find out how
                // big it should be
                resultSize = View.sUseZeroUnspecifiedMeasureSpec ? 0 : size;
                resultMode = MeasureSpec.UNSPECIFIED;
            }
            break;
        }
        //noinspection ResourceType
        return MeasureSpec.makeMeasureSpec(resultSize, resultMode);
}
2.4 View的measure过程
这里的View不包括 ViewGroup啦~, 只是一个单纯的View控件而已; 其默认测量规则如下; 这里以getSuggestedMinimumWidth()为例, 这里的mMinWidth指的是android:minWidth属性, 默认为0, 如果设置了背景, 则返回背景宽度和指定mMinWidth中的最大值; 至于getDefaultSize()则是返回默认尺寸, 我们只需关心AT_MOST和EXACTLY两种情况即可(因为UNSPECIFIED一般用于系统, 不常用), 可以看出, View对于这两种情况默认都是返回的specSize, 即传入的尺寸,
我们上面说了AT_MOST对应wrap_content模式, EXACTLY对应match_parent和指定数值情况, 而getDefaultSize()将这两种情况都默认返回了specSize, 即父View可用空间, 很明显, 这对于wrap_content是不支持的(因为此时的wrap_content就相当于match_parent), 所以在自定义View的时候, 需要自己根据逻辑实现wrap_content的情况, 具体实现可以参见TextView和ImageView等对wrap_content的支持
protected void onMeasure(int widthMeasureSpec, int heightMeasureSpec) {
        setMeasuredDimension(getDefaultSize(getSuggestedMinimumWidth(), widthMeasureSpec),
                getDefaultSize(getSuggestedMinimumHeight(), heightMeasureSpec));
}

// 这里以Width为例
protected int getSuggestedMinimumWidth() {
        return (mBackground == null) ? mMinWidth : max(mMinWidth, mBackground.getMinimumWidth());
}

public static int getDefaultSize(int size, int measureSpec) {
        int result = size;
        int specMode = MeasureSpec.getMode(measureSpec);
        int specSize = MeasureSpec.getSize(measureSpec);

        switch (specMode) {
        case MeasureSpec.UNSPECIFIED:
            result = size;
            break;
        case MeasureSpec.AT_MOST:
        case MeasureSpec.EXACTLY:
            result = specSize;
            break;
        }
        return result;
}
当然, 最终我们确定View的尺寸之后, 还需要通过setMeasuredDimension()正真设置和作用到View上; 需要注意的是, 此时只是View的测量宽高, 可能不是实际宽高, 实际宽高在layout过程中才能确定, 出现测量宽高和实际宽高不相等的原因 主要是在layout过程中改变了View实际布局的位置尺寸等造成的, 但是一般情况下二者都是相等的
2.5 自定义View时measure过程注意事项
到这里, 其实View绘制过程中的measure过程就已经讲解完了; 但是笔者还想提一下在实际使用, 即自定义View时, 还需要注意哪些方面; 这里需要提前声明的是, 下面所说的View不包含ViewGroup, 只是单纯的子View~
-
View需要自己实现对wrap_content的支持 -
View和ViewGroup需要自己处理padding的情况,ViewGroup还需要处理margin的情况 -
记住使用
setMeasuredDimension()使测量尺寸生效, 否则会抛异常
三. layout过程
layout过程会确定View最终的位置和尺寸, 对于ViewGroup而言, layout过程才是真正实现不同布局的关键; layout过程的传递是从ViewRootImp中的performTraversals()开始的, 在performTraversals()中去调用了performLayout()开始往下传递layout过程; 而在performLayout()中则是去调用了mView.layout(0, 0, mView.getMeasuredWidth(), mView.getMeasuredHeight());, 前面我们已经说过了mView其实就是DecorView,
但是这里我们并不去分析DecorView的layout()方法, 因为这是针对某一具体布局而言的; 我们这里选择具体分析ViewGroup的layout()
对于ViewGroup而言, 其layout()方法如下; 可以看出其调用了View.layout(), 在View.layout()中, 可以看出调用了View.onLayout(), 而View.onLayout()在View中是一个空实现, 同时还需要注意一点就是ViewGroup的layout()方法是由final修饰的, 这也就意味着自定义ViewGroup的时候, 不能重写layout()方法, 另外, ViewGroup的onLayout()是一个抽象方法, 也就是说我们必须自己去是实现; 其实这也很好理解, 因为对于自定义ViewGroup来说, 我们需要实现自己的布局,
这里实现逻辑其实就是写在onLayout()中即可
// ViewGroup.layout()
public final void layout(int l, int t, int r, int b) {
    ...
    super.layout(l, t, r, b);
    ...
}

// View.layout()
public void layout(int l, int t, int r, int b) {
    ...
    boolean changed = isLayoutModeOptical(mParent) ? setOpticalFrame(l, t, r, b) : setFrame(l, t, r, b);
    ...
    onLayout(changed, l, t, r, b);
    ...
}
另外, 还需要注意一点的是, View的layout()方法中还调用了一个setFrame(), 该方法的作用其实是设置View的mLeft, mRight, mTop, mBottom的值; 这里反应的其实是上文说过的一句话, 即measure过程中确定测量宽高, 实际宽高需要在layout过程中确定; 这里就是记录View的实际宽高; 至于View的测量宽高可以通过getMeasuredWidth()和getMeasuredHeight()来获取, 这在measure过程之后即可得到; 实际宽高可以通过getWidth()和getHeight()来得到,
这在layout过程之后可以获取; 至于二者的区别, 这里以getMeasuredWidth()和getWidth()为例, 如下; 可以看出getMeasuredWidth()获取的其实就是MeasureSpec中的SpecSize, 而getWidth()获取的则是实际宽高(因为是View的右边界减去左边界); 上面已经说过了测量宽高和实际宽高的区别, 这里就不再赘述啦~
public final int getMeasuredWidth() {
    return mMeasuredWidth & MEASURED_SIZE_MASK;
}

public final int getWidth() {
    return mRight - mLeft;
}
layout过程比较简单, 也是一个递归调用的过程, 至于自定义View时主要是在自定义ViewGroup需要涉及到layout过程的设计, 需要考虑的还是要padding和margin的影响啦~
四. draw过程
View的draw过程其实就是其draw()方法, 在前面performTraversals()中, 最终会调用到mView.draw()(实际上调用栈是: performTraversals() –> performDraw() –> draw() –> drawSoftware() –> mView.draw())
自定义View时官方并不建议去重写draw()方法, 而是建议重写onDraw()去实现自己的逻辑, onDraw()在View中实际上是一个空实现; 我们这里先来看draw()的实现逻辑
官方文档注释中已经说明了draw()过程的实现逻辑, 如下; 可以看出, 主要绘制逻辑为:
-
绘制背景
-
绘制内容(即自己)
-
绘制子
View -
绘制装饰, 如滚动条等前景
注: 第2步和第5步一般会跳过
// View.draw()
public void draw(Canvas canvas) {
        ...
        /*
         *      1. Draw the background
         *      2. If necessary, save the canvas' layers to prepare for fading
         *      3. Draw view's content
         *      4. Draw children
         *      5. If necessary, draw the fading edges and restore layers
         *      6. Draw decorations (scrollbars for instance)
         */
        ...
         // Step 1, draw the background, if needed
         if (!dirtyOpaque) {
             drawBackground(canvas);
         }
         // skip step 2 & 5 if possible (common case)
         // Step 3, draw the content
         if (!dirtyOpaque)
            onDraw(canvas);
         // Step 4, draw the children
         dispatchDraw(canvas);
         // Step 6, draw decorations (foreground, scrollbars)
         onDrawForeground(canvas);
         ...
}
我们知道, 绘制内容这一步是调用的onDraw(), 即我们自己自定义View时需要实现的内容; 另外, 这里需要注意的一点是绘制子View时, 通过dispatchDraw()去传递绘制绘制过程, 该方法在View中是一个空实现, 一般用于ViewGroup时; 在ViewGroup中其实现如下; 其实就是遍历所有的子View, 然后依次调用子View的draw()方法绘制出子View即可
protected void dispatchDraw(Canvas canvas) {
    ...
    for (int i = 0; i < childrenCount; i++) {
        ...
        more |= drawChild(canvas, transientChild, drawingTime); // 在drawChild()中调用child.draw(canvas, this, drawingTime)将绘制过程传递
        ...
    }
}
五. 总结
到这里, View的整个绘制流程就讲解完成啦~, 当然这对于我们随心所欲的实现炫酷的自定义View还是第一步理论基础, 真正要做到还是需要靠自己多动手去画咯~